
Fixed gear bikes are an essential mode of transportation that includes a drivetrain with no freewheel mechanism. Wherever you go, to the school or the local shop, a fixed gear bike is all that can meet your commuting needs. Did you get a brand-new model but it’s still not in use due to its unassembled state? It doesn’t feel good; we know it. Let’s get to the guidebook on fixed gear bike assembly.
Have you already bought a fixed gear bike? If not, go through the buyer’s guide and make no mistake in getting yourself a perfect fixed gear bike for yourself. But, if you have, your next task would be to assemble fixed gear bike.
Many experts prefer assembling their own fixed gear bike. Assembling your own bike lets you know about your stuff thoroughly. Manufacturers send these bikes in a half or semi-assembled manner. But you have to do the rest. So, for your convenience, we have attached here a step-by-step procedure that you can take into account in order to assemble a fixed gear bike.
Fixed Gear Bike Assembly – 9 Steps
Step 1: Gathering the tools
- Your first task is to grab the tools required to assemble fixed gear bike. So, the tools you will need are:
- 15 mm socket wrench
- A hex wrench with four, five and six millimeters or combo folding wrench
- Open face 15 mm pedal wrench
- Lock ring tool
- Bike grease for pedals, stem bolts and seat post
Step 2: Unboxing
It’s time to unbox your bike. Hold its rear wheel and frame to lift it out. Be careful while doing this. Keep it flat on the floor while its attached front wheel is upward.
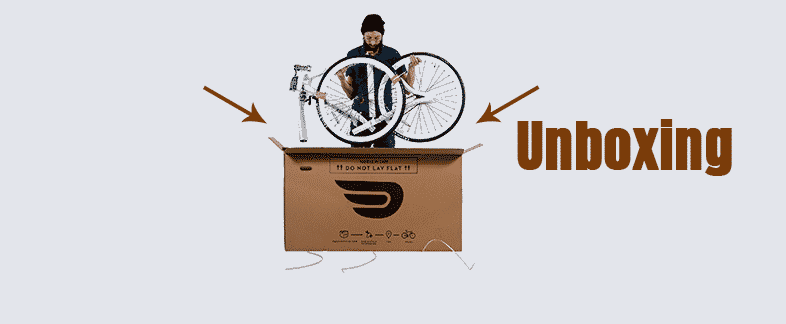
Step 3: Unwrapping and positioning the bike
Put off any kind of packaging materials from your bike. For example- plastic protectors from the axle, black protectors from the front and rear dropouts, or any other wrapped materials. As the packaging is laid out, let the bike stand in an upright position with the fork and protector on the ground.

Step 4: Assembling the wheels
Take your wheel and your 15 mm wrench to assemble the wheels. But, before you do this, turn the small black lever outward to the open position. This lever is placed on the brake caliper called the brake quick release. Put the wheel loosely, get them finger tight, rotate the wrench and make sure to tighten the axle nuts accurately. The wheel should be loose to continue the further procedure. Re-arrange the brake quick release.

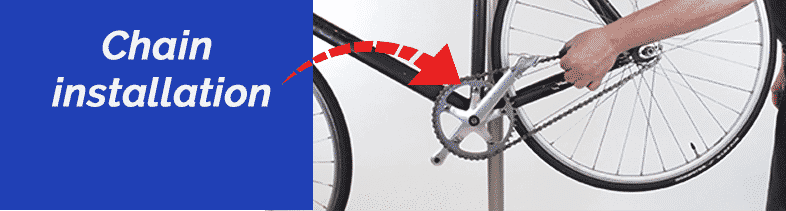
Step 5: Chain installation
Lock rings are important as it keeps your gear from slipping. Take the chain by pulling it off to the side of the loosen rear wheel and rolling it backwards. As soon as it is done, pull the chain out and take the wheel off. With the help of your locking tool, insert it into the wheel, snug it into the position and push down towards the floor. Once it is done, put the wheel in its place. Reattach it, loop the chain around the gear and roll it backward again. You have to tighten the nut now and the wheel will be all set.
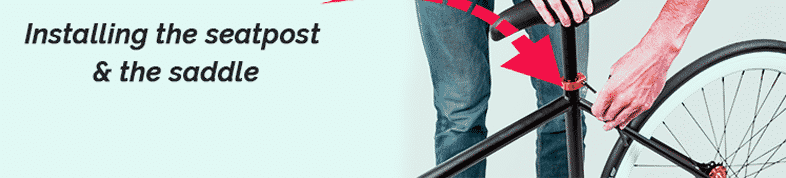
Step 6: Installing the seat post and saddle
Now, you have to loosen the seat post collar in order to remove it. You can do it by using a 5 mm Allen key. Put grease inside the seat tube of the frame only. In order to make the seat post collar even with the bike frame, you can replace it. Put the seat post in the frame and make sure to put it in a way that the minimum insertion maker remains under the collar and the saddle coordinates with the frame. Again take your 5 mm Allen wrench and tighten the seat post collar appropriately.
Step 7: Mounting the handlebar and brake
Our next task is installing the handlebar and brake install. Now, let the stem face plate unscrew from the stem. You can use your 4 mm allen wrench to unscrew it. Keep the handlebars in the middle and screw it in the bolts. A little bit of each bolt at a time will make your handlebars tighten uniformly. As soon as the bolts are tightened, place your bars and make sure to tighten the rest of the way until you can no longer twist the bars out of position. In the meantime, take the front brake level which was already adjusted to the brake caliper and frame. Now, take off the clamp bolt with the 4 mm allen wrench. Finally, take the brake lever on the left side of the handlebar and place the brake lever securely. You can take the help of clamp bolt for putting it.

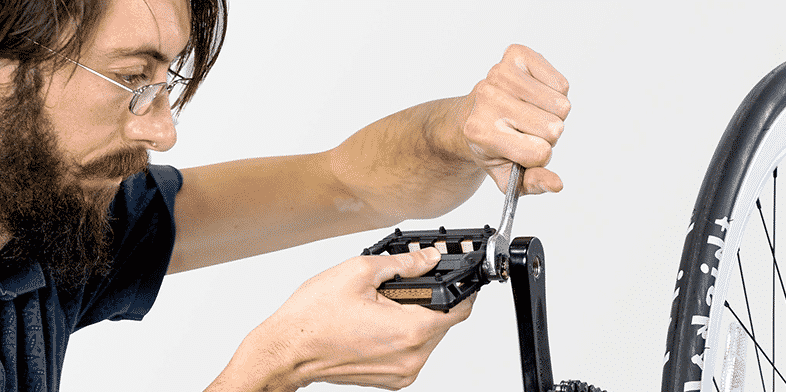
Step 8: Pedals assembly
For installing the pedals, take both the right and left pedals. Most of the bike already marks “R” or “L” to indicate the right or left pedals. “R” will be the driveside and “L” will be the opposite. Grease the pedals before installation to ensure its swift movement. Take the 15 mm wrench and the right pedal and insert the pedal thread in the right crank arm. Rotate it clockwise and be sure to tighten it properly with your wrench. Do the same or left pedals. But, for your information, you should know that the left pedal is reverse threaded (anti-clockwise).
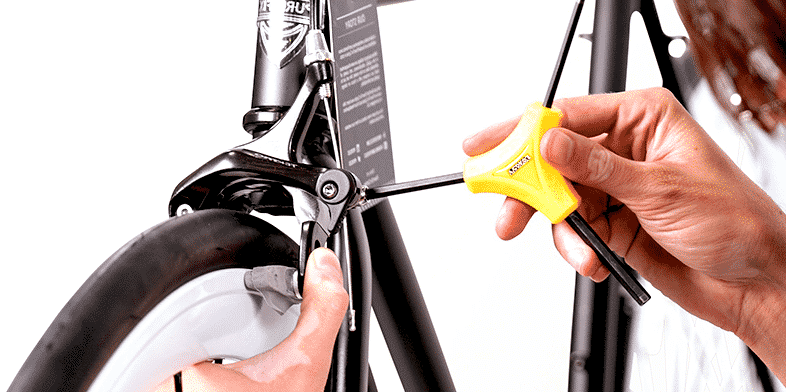
Step 9: Adjusting the brake
For adjusting frontal brake caliper, first make sure that the brake calipers are secured and tighten the screw if needed. Take a 5mm allen wrench and then unscrew the nut holding the cable. Position the brake pads over the rim and stay fix in that position. Drag the cable downward and then tighten the fastening nut. Fix the brake pad height using the screw so that brake band and brake pad have direct contact. Adjust the back brake caliper in the same way like the front brake caliper.
Make sure to check all the adjustments and re-adjust if you find any fault. Once the assembly is done, you are good to go. So, this is how you can assemble fixed gear bike. If you have not learn to ride a fixed gear bike yet, take the help of different articles and start riding soon.


