
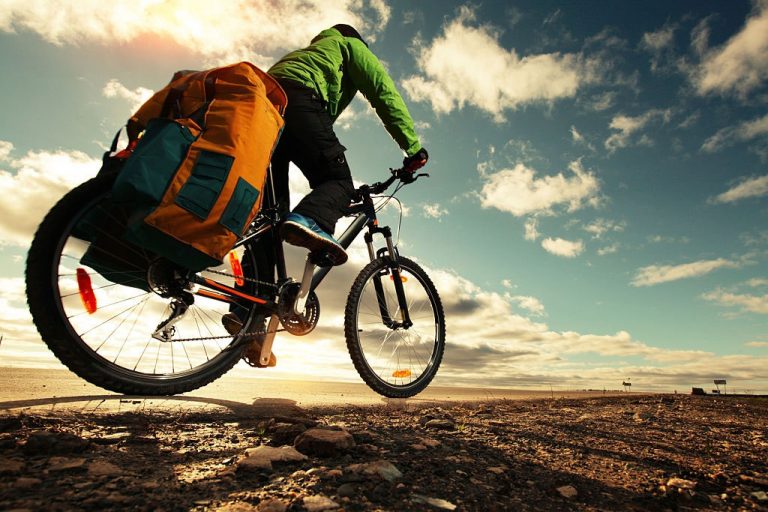
If you’re a backcountry hiking enthusiast, but you’re also passionate about mountain biking, there’s a new trend that combines both disciplines. It’s commonly known as bikepacking.
It consists in going into unexplored places with your touring bike, taking with you what is strictly necessary to survive. Obviously, if you don’t want to experience deficiencies during the trip, you must be well equipped and plan ahead what you’re going to take.
Many might think that bikepacking is the same thing as bike touring. But no. While bikepacking is about survival, bike touring is more about tourism. So, basically that’s the main difference between bikepacking vs touring.
In this article you’ll learn some basic tips on bikepacking setups to fully enjoy your next outdoor adventure.
Bikepacking 101 – Bikepacking Setups
For bikepacking, you don’t need to invest a small fortune in the best bike and the most expensive gear. You just need a good bike that moves well through difficult terrain and enough bags to store your articles and provisions.
Below, you’ll find a list of practical tips that will help you choose the best to carry with you.
1. Bike
There’s no golden rule about bikes. If a certain bike model is good for bikepacking, it doesn’t necessarily mean that it will be useful for you. So, the best bike that you can take to a bikepacking adventure is the one you already use.
If you feel comfortable while you ride and the bike is stable on difficult terrain, it’s certainly a good choice to take with you. If your bike doesn’t have an eyelet dropout to install panniers or racks, don’t worry. There are a lot of packs that can be adjusted in different parts of your bike’s frame.
If you still don’t have a bike for bikepacking and are thinking of buying a new one, consider any of these setups:
- Fat bikes
- Plus throw bikes
- Full-suspension bikes
- Gravel bikes and road bikes
- Hardtail and rigid bikes
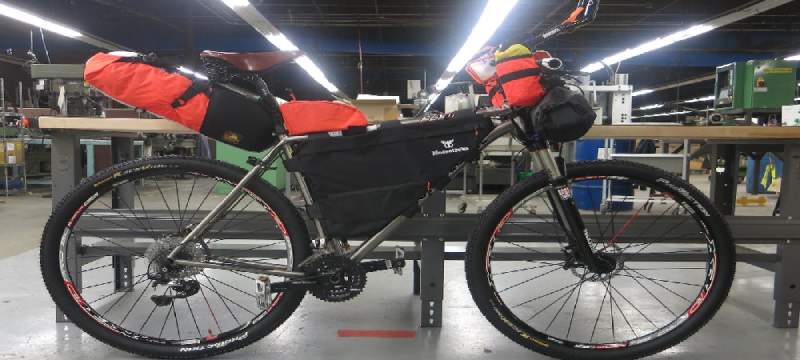
2. Packs
In the market, there’s a wide variety of penniers, bags and backpacks to choose from. Before making any decision, take into account the extra weight you’re adding to your bike. If the pack you choose is too big or too heavy, you’ll surely have problems during riding. Especially if you’re going through slope routes.
Below, you’ll find some useful ideas for using packs in different parts of your bike.
On the Seatpost
You can strap a dry bag of 5-7 liters of capacity onto the seatpost. This configuration is ideal to store water bottles and rolled clothes. Make sure the dry bag you choose isn’t too big, making the bike less stable.
On the handlebar
You can also strap a dry bag of 14-20 liters of capacity onto the handlebars. There, you can store your sleeping bag. You can also store a small tent and use its poles as supports to keep the bag in straight form.
Backpack
Some people consider that riding a bike using a backpack is quite uncomfortable. However, carrying a backpack with you during your outdoor adventure provides many benefits.
For example, you can use it to carry your cameras and other technology gadgets. You can also carry some extra water bottles, food and cooking tools. If you’re bikepacking with your partner, you can also carry an extra sleeping bag and blankets.
Seat packs
Seat packs are specially designed to adapt to seatposts without affecting the stability of the bike. Usually, they’re more expensive than a common dry bag. However, they’re much more practical and provide more storage space.
On the frame
You can also install a frame pack for bikepacking to store other essential items. Half frame packs are the best, because they adapt to all the different frame designs. However, in the market, you can also find some models specially designed to fit hardtrail and full-suspension frames.
Make sure you don’t fill your frame pack with too many things because it could interfere with the movement of your legs while you’re riding.
Cockpit
You can also strap a dry bag in the top tube located between the seat and the handle. In the market you can find packs specially designed for this purpose. They’re usually stiffer than a common dry bag, allowing the rider to rest their elbows on it.
3. Water Purification
If bottled water runs out, you’ll have to look for water in rivers, lakes and other places to stay well hydrated. However, raw water is full of pathogens that can harm you. To prevent that from happening, you should carry with you a mini filter and some water purification tablets.
While the mini filter removes large particles of mud and other contaminants, the tablets eliminate harmful microorganisms. Before buying tablets, be sure to check what kinds of pathogens it can eliminate.
Usually, water purification tablets give a chemical taste to water, which is unbearable for many people. Therefore, it’s advisable to use this method when there’s no other option available.
4. Lights
If your outdoor journey extends at night, you’ll certainly need lights. For maximum visibility, choose front LED lights. These lights consume little energy, extending the lifespan of your batteries. It’s also convenient to take a solar power bank with you to recharge your batteries with sunlight.
Some LED lights come with built-in solar panels. However, they aren’t very efficient and the batteries tend to discharge too fast.
5. Sleeping Kit
A comfortable and warm sleeping bag and a small tent are all you need to survive a night outdoors. Your sleeping gear should be lightweight, so you don’t have to try too hard to move the touring bike pedals due to excessive load.
Foam sleeping pads are a good option because they’re soft, light and easy to store. They also help preserve body heat during a cold night. Also, the tent and the sleeping bags must be waterproof to keep you protected during the rain.
6. Clothes
For bikepacking, you need two changes of clothes. One to use during the day and one for the night.
During the day, you can wear a fresh and light outfit. A cap, sunglasses, shorts, sports shoes, comfortable socks and a sweater is more than enough.
During the night, you need to protect yourself from the cold. So, you can use a versatile jacket, rain mittens, rain pants and a ski hat.
7. Kitchen & Food
In these cases, it’s convenient to keep things simple. So, the fewer things you need to prepare your food, the better. For example, you can bring homemade food that you just have to take out of your backpack and eat. Things like sandwiches and cookies.
However, if you want a more elaborated meal you can bring your own portable stove in your backpack. You can also create your own stove using a can of Coke.
8. Chamois Butter
Usually, cyclists may suffer skin from chafing due to rubbing with the seat. To prevent this, it’s advisable to apply lubricating creams on areas of the body subjected to constant friction.
Chamois Butter is a lubricating cream specially designed for cyclists. It’s applied on the padded section of cycling shorts, which is commonly known as chamois. It can also be used as a moisturizer, providing a refreshing effect on the skin.
However, it’s also convenient to wear sunscreen, repellent lotion, antifungal cream, disinfectant gel and wet wipes. If you have sensitive skin, you and also bring ointment to prevent red spots.
9. Shoes and Socks
Your cycling shoe pair should be comfortable and not generate friction with your skin. If it’s comfortable for you, use oversized shoes with layered up socks. Make sure the external socks are waterproof to protect your feet from external agents.
10. Organization
Before you start your adventure, it’s necessary that you organize the items you’re going to carry in each pack. It’s a good idea to use a pack for each different type of item. For example:
- Clothes on the seatpost pack
- Sleeping gear on the handlebar pack
- Tools and hydration in the frame pack
- Cameras and lights on the top tube pack
- Food and cooking tools on the backpack
Unlike a road bike, a touring bike provides storage for all these packings. This is just a suggestion. You can organize your items at your convenience even with a regular bike too. Memorize in which pack you stored each item, so you don’t waste valuable time trying to find something.
Also make sure that all the packs are correctly strapped and sealed, so your items don’t fall off the bike while you’re moving.
Certainly, the success of your outdoor trip depends on your good planning. You should think carefully about every detail to ensure that all your basic needs are covered during your adventure. Also, you should consider different bikepacking setups and choose the most convenient one according to your requirements.
As said before, for bikepacking it isn’t necessary to invest a fortune in new gear. Your old bike and some extra packs are all you need to experience some amazing moments of your life. So, don’t wait any longer and start making your own bikepacking plans.
FAQ
1. How much water do I need for Bikepacking?
It’s advisable to bring at least 10 liters of water per person. Backpacking is a high demanding activity, causing recurring thirst and fatigue.
2. What should I look for in a Bikepacking bike?
First, you must verify that the bike has eyelets to install racks and panniers. The space available on its frame must be sufficient to strap additional packs. Also, the bike must be stable and easy to handle on uneven terrain. So, it must have an advanced brake system and gear changes.


